

Before you start
Should You Install Before You Leave or When You Arrive?
We recommend installing your eSIM before you leave. This is because you need WiFi to install the eSIM, and also because then once you arrive you only need to change the "Mobile Data" setting in your phone to use the eSIM and you will be connected right away!
You can however install it when you arrive that is totally fine, just remember you need WiFi to do so and not tethered (hotspot) WiFi.
Tips & Reminders
- Activating a data-only eSIM is different to installing one. Activation happens automatically when you arrive in your destination, but before this you need to install your eSIM.
- Consider temporarily turning off apps like Google Sync to reduce background data usage.
- If you install the eSIM before travelling, don’t forget to change "Mobile Data" in your settings to the new eSIM once you arrive at your destination.
- To prevent roaming fees from your monthly provider we recommend turning off your Primary SIM - many providers don't charge roaming for just leaving it on but it's up to you to check
Method 1: Install by Scanning Your QR Code
The most popular method of installation is to scan the QR code you were sent via email when you purchased your eSIM - haven't received it? Contact us.
You will need to open the email on a different device and scan the QR code using your phone's camera - do not use a third-party QR scanning app as this won't trigger the installation.
Typically people scan the QR code off their laptop, tablet, a family member's phone, or a printed copy - all work fine.
Only have one device? No worries - skip ahead to Method 2 where you can install it manually using the ZenSim app.
Method 2: Install Manually via the ZenSim App
If you download the ZenSim app, you will be met with two different installation options:
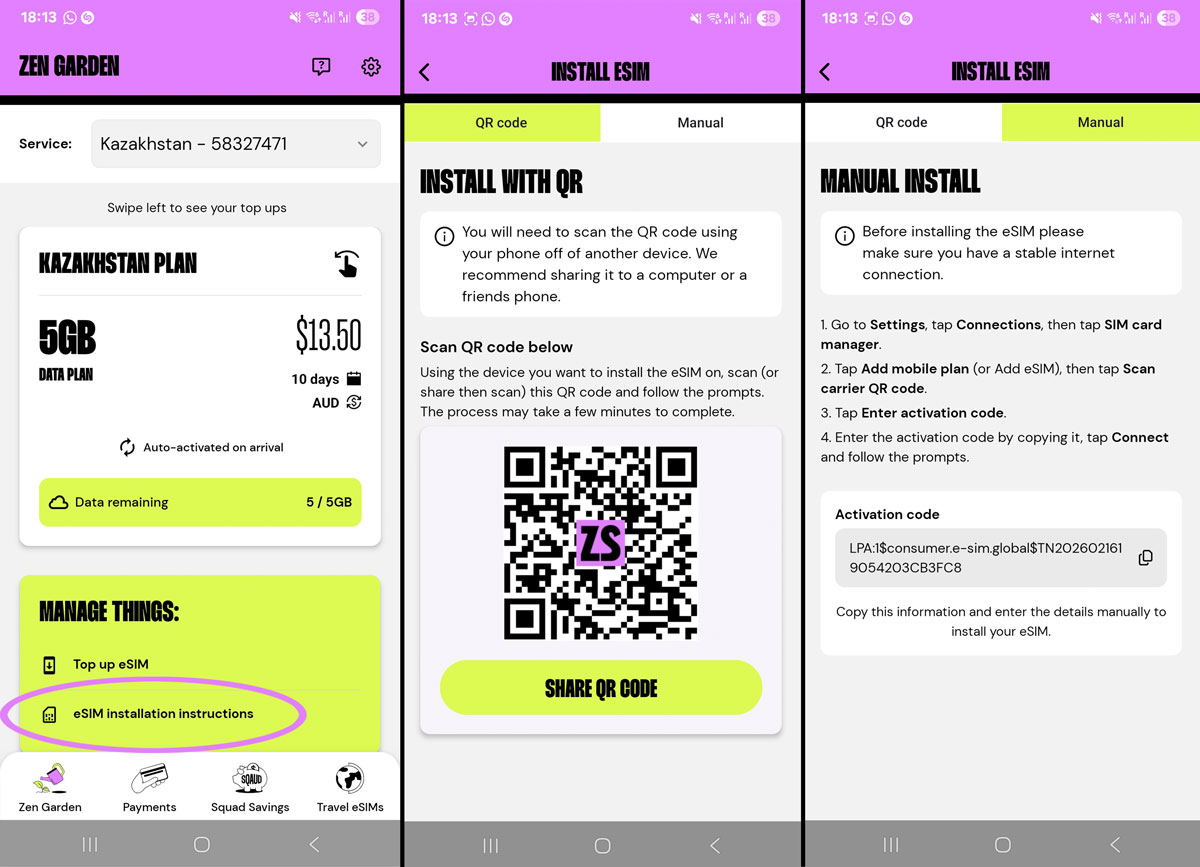
- QR code - Same as the QR option above you can share the QR code from the app to a device so you can scan it
- Manual install - Some people prefer to just copy paste the eSIM code into the settings manually so we give you instructions to do also
To manually install the eSIM to your Samsung device you will need to copy the Activation Code from within the app, then follow these instructions:
- Settings > Connections > SIM manager > Tap Add eSIM
- Tap Scan QR code from service provider
- When prompted, tap “Need help?” or “Enter code manually” (usually at the bottom)
- Enter activation code you copied from the ZenSim app
- Tap Connect / Download
Completing Installation
Follow the prompts:
Once you have begun installation using one of the above methods you may be asked a few questions (these vary based on Android version), most are pretty self explanatory but we can run through the potential prompts here - note you may not see all (or any) of these prompts which is totally fine:

- Edit SIM names - We recommend naming your Travel eSIM something to distinguish it from your other SIM such as "Travel" or "Europe"
- Preferred SIM for calls - Set this as your Primary (home) SIM as travel eSIMs are data only
- Preferred SIM for messages - Set this as your Primary (home) SIM as travel eSIMs are data only
- Preferred SIM for mobile data - If you're NOT overseas yet select your Primary (home) SIM - you will change this when you land abroad - but if you ARE overseas set this to the Travel eSIM.
Confirm eSIM installed
If you jump into Settings > Connections > SIM Manager you should be able to see your eSIM listed under eSIMs.
Not overseas yet? - You can continue the other steps after you arrive, you're good for now.
Already overseas? - Then proceed to set Mobile Data and enable Data Roaming as explained below.
When you arrive overseas
Do these things when you land:
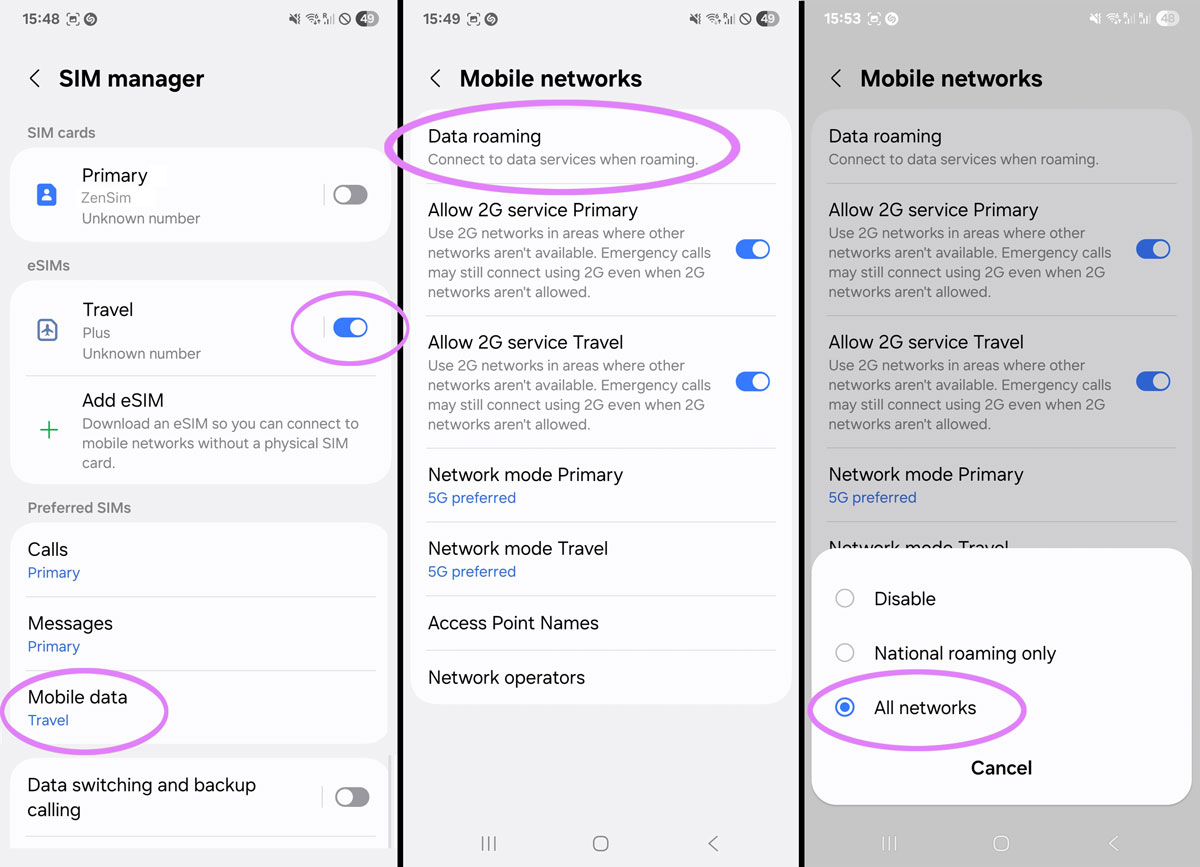
- Open Settings > Connections > SIM Manager
- Scroll to the bottom and set Mobile Data to use your new travel eSIM
- Go back to Connections and tap on Mobile Networks
- Confirm Data Roaming is ON or set to All Networks
- Turn on flight mode, wait 30 seconds, turn it off again
Once you do the above you should be able to connect, note it can take up to 15 minutes to find the network in a new country for the very first time.
Do not scan the QR code again
If you already have the eSIM installed like we confirmed above you do not need to scan the QR code again, this will display an error which will tell you the QR code has been used already since the eSIM is already installed.
The eSIM will activate automatically
You do not need to do anything to "Activate" the eSIM provided it is installed already and you have followed the instructions above for when you land it should be all gravy.
You do not need to click anything or scan anything and you don't even need to use or download our app in order to use the eSIM - but we do recommend our ZenSim app for topping up and checking your balance of course.
Common errors
"Can't set up eSIM" / "Failed to install" error
- Firstly ensure you are connected to good WiFi (not hotspot or tethered) and you have disabled any VPNs or parental control software and trying again.
- If you still see this error we recommend trying to install the eSIM manually by following the instructions above in Method 2.
- Confirm the eSIM is not already installed - check Settings > Connections > SIM Manager > It should be listed under eSIMs
Still not working? Reach out to us and we will get you up and running ASAP.
QR code scanned but taken to a random website or nothing happens
Ensure you're using your phone native camera or native QR code scanner to scan the QR code - do not use a third party app to do this.
Also make sure you have no VPN active or Screen Time / Content Restrictions enabled on your device.
If in doubt, you can follow the manual installation instructions above in Method 2 instead.
If you still can't get it working - contact us and we will help you out.
Suscríbete
Únete a nuestra comunidad
Te contactaremos cuando lancemos nuevos productos, proyectos de sostenibilidad, promociones, innovaciones o incluso contenido interesante que creemos que vale la pena compartir contigo.


